Use Google DNS Server, makes your internet faster!
We used to talk about “DNS Setting Tutorial” , and many people start to ask Why after finish setting, still shown Server not found? In this case there are several reason for that
- One might be that Website Owner’s DNS Server is not update instantly, most DNS Server provider update every 24-48 hour to decrease the high volume load of their server. In this case, if you are the Website Owner, I would recommend you use Cloudflare as your DNS Server provider, because their DNS Server is update instantly, we use their DNS Server too.
- Another is the one we are going to teach today, also it’s the one that can be configure by client side. Most Internet provider default DNS to their local DNS Server, and those were usually update every 24-48 hour, base on the data from our faculty, that some DNS Server update up to 48 Hour, which is very bad. If Website A decide to change Server from Server 1 to Server 2, than part of their client might have to wait 48 hour to see their website again. And Google DNS Server it’s the one who update DNS record instantly, also it’s faster than most of the default DNS Server.
Let’s start with today’s tutorial
Windows 10 Setting Tutorial
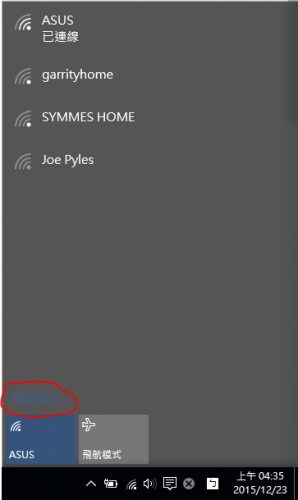
First find your network icon from the status bar (The figure shown is a Wireless Network icon)
After you Click it you will see “Network Setting”
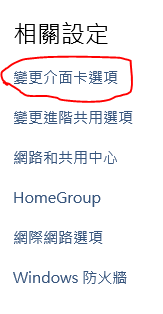
Then select “Change Network Interface Option”
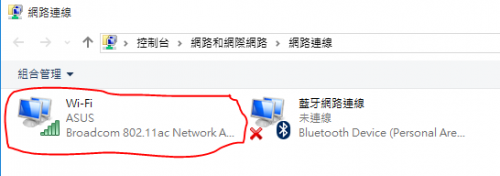
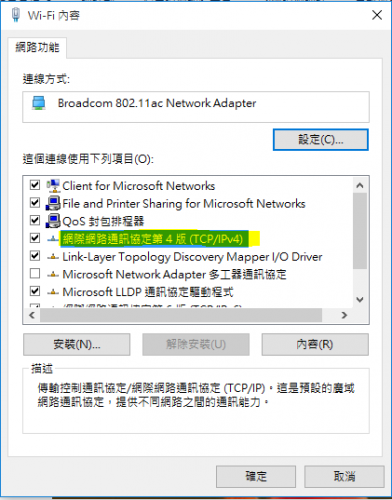
Find the Network Interface that you currently using, usually it’s the first one, and just find the one is currently connected.
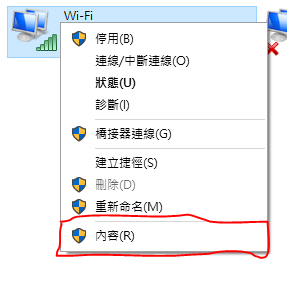
After you found it, right click on that, and click “Property”
Here’s the big point of today, I am going to teach everyone about how to configure IPv4 DNS to Google.
Double click “Internet Protocol Version 4 (TCP/IPv4)”
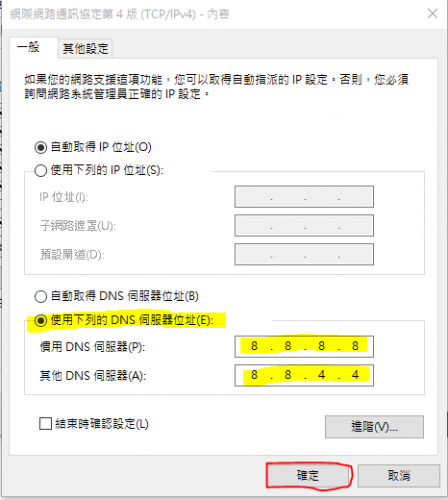
Select “Use the following DNS server addresses” and follow the highlighted area on the diagram. After finished click “OK”
Preferred DNS server: 8.8.8.8
Alternate DNS server: 8.8.4.4
At this point, most people were good to go. But some people might already start using IPv6, so we want to covered this tutorial on IPv6 too!
Continue to IPv6, after you click “OK” You will be back to the previous page, and now find “Internet Protocol Version 6 (TCP/IPv6)” and double click it.
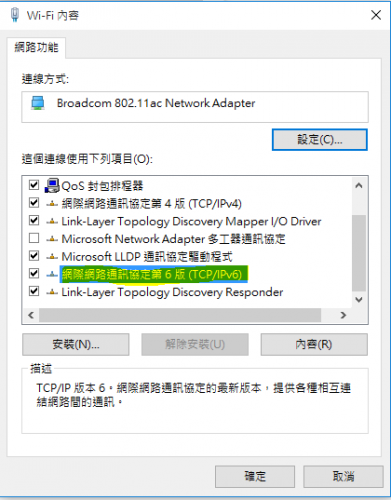
Select “Use the following DNS server addresses” and follow the highlighted area on the diagram. After finished click “OK”
Preferred DNS server: 2001:4860:4860::8888
Alternate DNS server: 2001:4860:4860::8844

Now you finish Google DNS configuration on both IPv4 and IPv6!
Latest posts by clark (see all)
- Clark’s Domain Management System Tutorial - April 5, 2017
- 【New Feature】Clark’s Domain Management System – Major update - October 31, 2016
- 【Tutorial】Cloudflare – The best tool for speed up your website - August 12, 2016